In the last article, I have shown you how to backup WordPress site inside your local computer? So, this article is an add-on to it. In this article, I am gonna break down a step-by-step way to restore a WordPress backup from your computer. So keep reading.
Note- in this article I will be showing the way which will help you to restore the WordPress backup which you have created manually inside your computer. If you are looking to restore the backup using a plugin you can read our comprehensive guide on, How to backup and restore a WordPress site using a free plugin?
Things you will Learn
How To Restore WordPress Backup From Computer?
Well, by reading the last article you have created the backup of your WordPress site. If you haven’t created the backup yet, read this article. Because without a backup you will not be able to follow the steps which I am going to show you in this article.
You can restore the backup of your WordPress site in 2 steps.
- Restoring the files and folders of your WordPress site from the backup.
- Restoring the database of your WordPress site from the backup.
Let’s read about them one by one.
How to restore the files and folders of your WordPress site from the backup?
To restore the files and folder of your WordPress site you need to upload them to your server first. Then after you can restore them to your actual site.
There are two simple ways to upload them, first is using C-panel, second is using FTP.
Note, I am considering that you have backed up your WordPress files and folders inside a Zip file. If not then create the Zip of your files and folders to upload it to the host. Or read this article.
Uploading Files Using C-Panel
To upload the Zip file using C-panel first login inside the C-panel of your web hosting.
From the C-panel head over the root directory or the public_html folder of your WordPress site.
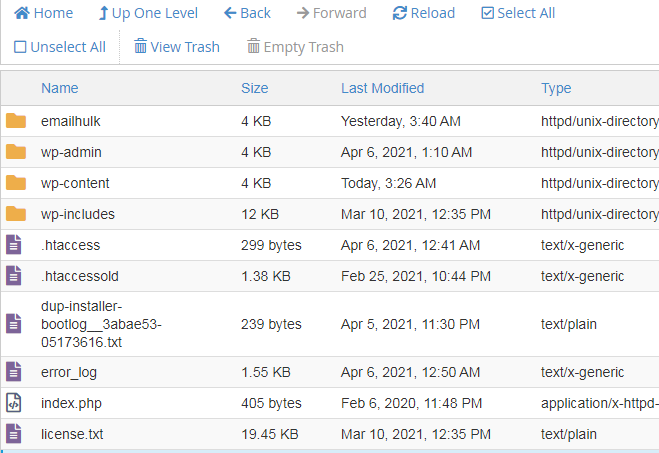
In the screenshot above, you can see the root directory of my site where all the files and folders of my site are present.
Well, there is already my old site that exists inside the root directory, so my root directory is not empty.
Now what I can do? Either I can delete all the files and folders of my website from the root directory. Or I can upload the Zip file and override all the folders and files.
I would suggest you deleting all the folders and files from the root directory, so that you don’t get confuse.
Note, If you are switching your host, then definitely the root directory or the public_html folder will be empty.
Next step, now upload the Zip file of your WordPress site to the root directory. You can see the upload button somewhere inside the root directory, depending upon the C-panel of your web hosting provider.
After uploading the Zip file now your next step is extracting the Zip file inside the root directory of your site. So extract it.
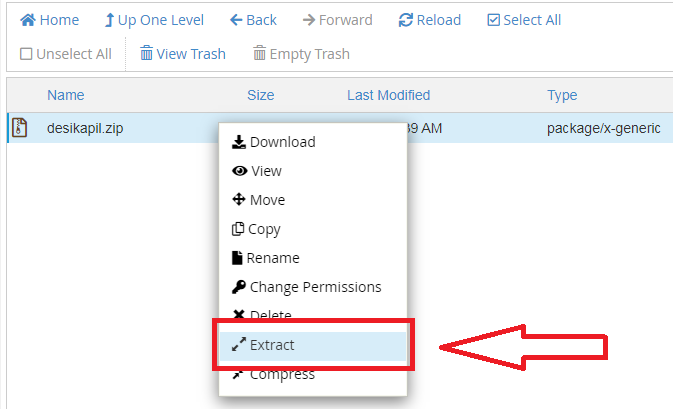
After extracting the Zip file you can see the extracted folder at the public_html folder. If you don’t see it, kindly refresh the page.

As I can see my website is extracted inside the desikapil folder. But I want it inside the root directory. So I will move all the files and folders of my site from the desikapil folder to the root directory of my site.
Now I will delete the desikapil folder and desikapil.zip file from the root directory. Because now they are unnecessary for me.
Uploading files using FTP
If you don’t want or for some reasons not able to upload your site using C-panel you can use FTP to upload your site.
FTP is one of the best ways to communicate with servers. You can upload, download or delete files on your server using FTP. Here is how?
First download the FileZilla client application inside your computer. Establish the connection with your server using FileZilla, So that you can push the Zip file to server.
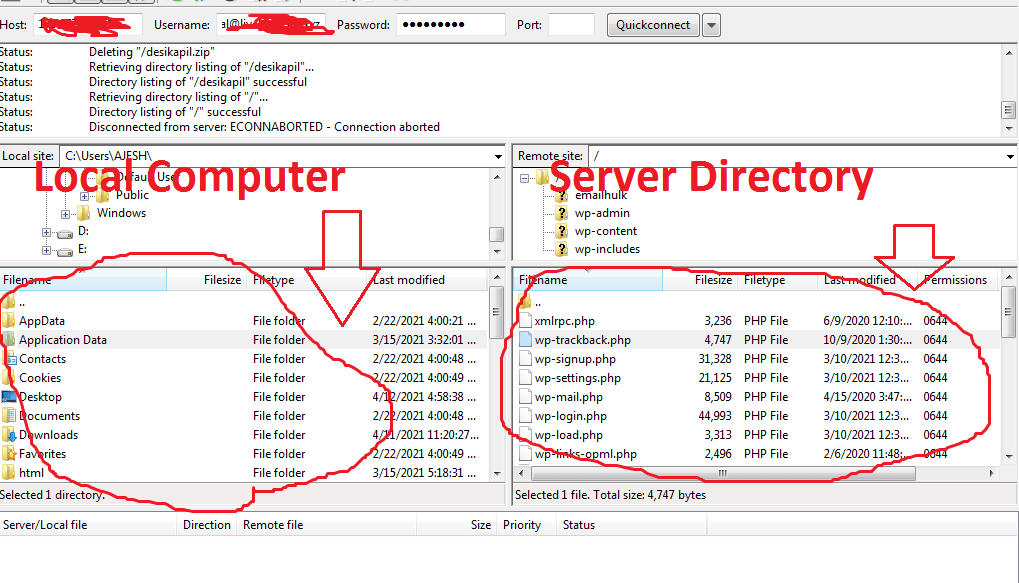
After establishing a successful connection with your server. Inside FileZilla, you can see the left window is your local computer and the right window is your server directory.
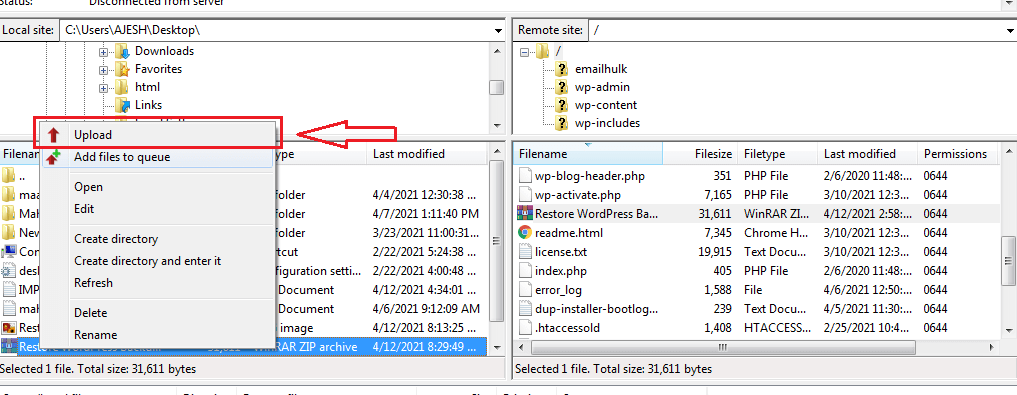
Now upload your website From your computer to the server.
How to restore the wordPress database from the backup
After restoring the files and folders of your WordPress site, now it’s time to restore the database of your site.
To restore the database of your WordPress site login inside the C-panel of your web hosting.
Head over the database then phpmyadmin from the C-panel.
Inside the phpmyadmin find out your older database of your website or create a new one.
After that import all the tables of the database which you have backed up inside your computer.
If you want step-by-step tutorial, you can always check out our comprehensive guide on how to backup and restore WordPress database? This article covers a step-by-step tutorial for you.
How to restore WordPress plugins from backup?
Either you can restore your entire WordPress site including all the files and folder and the database. Or you can choose to restore your site partially such as the plugins or themes folder only. Or the database only. Depends upon you.
So, here is the way to upload the WordPress plugins from the backup to your live site. Let’s see how?
Login inside the C-panel>head over the root directory of your site.
From the root directory of your WordPress site, head over the wp-content folder.
Now from the wp-content folder head over the plugins folder.

Now inside the plugins folder you can upload the plugins which you want to upload.
You can upload plugin(s) to your site Either using c-panel or FTP.
how to restore WordPress themes from backup?
Uploading WordPress themes to your live site from the backup is pretty easy. Inside the wp-content folder you can a folder for Plugins and themes as well.
Inside the themes folder all the themes of your WordPress site is stored. inside the themes folder you can upload your desired themes or your can replace this folder with your backup folder.
i think it is pretty easy to do and you also can do it very easily if you read this article from the beginning.
Conclusion
in this article I tried to create a step-by-step tutorial for you so that, you can successfully restore your WordPress site from a backup.
If you still feel any doubt or any catchy gap which you think should be covered during this article. Feel free to ask me in the comment section.


![Read more about the article 2 Easy Ways Backup & Restore WordPress Database [Step-By-Step]](https://www.desikapil.com/wp-content/uploads/2021/03/How-To-Backup-WordPress-Database_-compressed-300x160.jpg)
![Read more about the article 7 Best WordPress Backup Plugins Compared [ Free And Paid ]](https://www.desikapil.com/wp-content/uploads/2021/04/WordPress-Backup-Plugins-Comapred-1-compressed-300x200.jpg)
Well done
Hey.! Thank you Khushbu.
Your welcome sir………this blog is helpful for ………………